Here’s a common situation: I’m sitting in my studio editing business headshots when a recent client contacts me...
Client: “I opened up a digital file I want to print and I noticed it has a DPI of 72. Is this good enough to print photographs? How do I print from a 72 DPI image? How big can I print from this 72 DPI image?
Me: “Well, at this stage it’s not the DPI you should be concerned with. It’s the number of pixels your image contains which determines how large you can print. We need to differentiate between the resolution of your digital file, and the resolution of your printer. Let me explain…”
Clients often have questions and concerns about resolution and image size. In this article, I’ll try to put those worries to rest without overcomplicating things.
Please leave a comment below if you still have questions and I will be happy to reply.
What are Pixels?
Every digital image is made up of pixels. Individual tiny square dots, each one it’s own specific color, and when combined can make an image. The more pixels you have, the better an image will look. And it’s not just the quantity of pixels, but the quantity of pixels you have per square inch.
When people start talking about pixel quantity, what they are really talking about is resolution, and this is where things can get confusing, because unfortunately the term “resolution” is not specific when talking about either screen or print resolution.

A digital camera or scanner is capable of capturing an image at a certain resolution. The monitor you view your image with has it’s own resolution. And should you decide to print a digital file, the printer has it’s own resolution.
When we use the term resolution while discussing how an image will look on a screen, we are normally talking about how many pixels an image contains, which can be determined by multiplying width by height.
When we use the term resolution when discussing printing an image, we are normally talking about how many dots per inch a printer can print. DPI.
But either way, resolution is basically describing some sort of dots per inch, either pixels or sprayed dots of ink.
What is Print Resolution?
When thinking about printing your image, I want you to think in dots per inch (DPI). Why? Because printers today spray ink onto paper, and the more dots per inch sprayed, the higher the quality of the final print. Most printers will print at a maximum of 300 DPI.
So here is the big question which brought us to the point…
How many pixels does your image need to contain if you want to print a 4×6 photograph at 300 DPI?
Doing the Math. How many pixels do I need to print a photograph?
To figure out how large a print I can make from a particular digital file, I have to do a little math.
To print a 4×6 photo at 300 pixels/inch, I would need a minimum of 4×300 (1200) pixels on the short edge and 6×300 (1800) pixels on the long edge. 1200 pixels X 1800 pixels = 2,160.00 pixels.
Your digital file will need a total of two million, one hundred and sixty thousand pixels in order to print the highest quality 4×6 photograph your 300dpi printer can print.
This same formula applies to any size of print. An 8×10 photograph at a resolution of 300 DPI would need to be 8×300 (2400 pixels) on the short edge and 10×300 (3000 pixels) on the long edge.
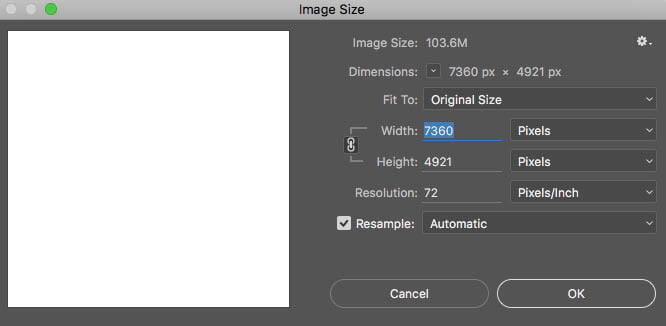
Client: “But wait Aric. My image editing software says my digital file is 7360 x 4,921 pixels at 72 DPI? You said my image needs to be 300 DPI to print.
Me: “Remember, first and foremost it’s all about the amount of pixels your image contains. Let me explain…”

Remember earlier we said a 4×6 printed at 300 DPI will need 2,160,000 pixels. Well lets do the math again with the image you have at 72DPI. How many pixels does it contain?
7,360 X 4921 = 36,218,560 36 million pixels! That’s a ton of information, and more than enough to print a 4×6 photograph which only requires 2 million pixels. (I used this particular pixel dimension as an example as this is the resolution of one of my own cameras.)
And this brings me to a small side note. This is where we get the term “megapixels” from. Camera companies sell their cameras based on many different features, one of the most important being megapixels. If your camera produces files that are 7,360 pixels X 4921 pixels at 72 DPI, then each image contains 36,218,560 pixels, but with numbers this large the camera companies just round to the nearest million, so in this instance you would have a 36 mega pixel camera.
Back to my client….
Me: “If your digital file is at least 1200×1800 pixels, then yes, you have enough pixels to print a 4×6 at 300DPI.”
How Do You Convert A 72 DPI file into a file that is 4×6 inches at 300 DPI For Printing?
First, using the method above, determine if your digital file has enough pixels capable of printing the size print you want at 300 dpi.
Client: “Aric, I have more pixels than I need to print a 4×6.
Me: “Perfect. We’ll need to convert your image into a 4×6 at 300 DPI so your printer will print correctly. I’ll teach you the two most basic methods; resampling and cropping. Both methods will require you have some sort of image editing software. ”
As a professional photographer I use Adobe products to edit and manipulate my images, so for the purposes of this article I will describe these two different methods of converting the size of an image using Adobe Photoshop.
The First Image Sizing Method: Resampling
In your image editing software you should find a window which shows your Image Size information. In Photoshop this window is called…. wait for it… Image Size. It looks something like this.

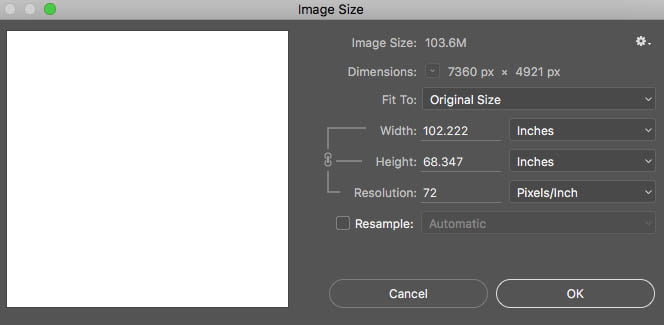
Next, deselect the resample box and you will notice your width and height are now displayed in terms of inches as opposed to pixels. And also notice how you can no longer manipulate the resolution of the image without effecting the width and height of your image.
Next, remember the term resolution is interchangeable between your digital file and printed image. Pixels vs Dots. With that in mind, change the resolution from 72 to 300 and see what happens.
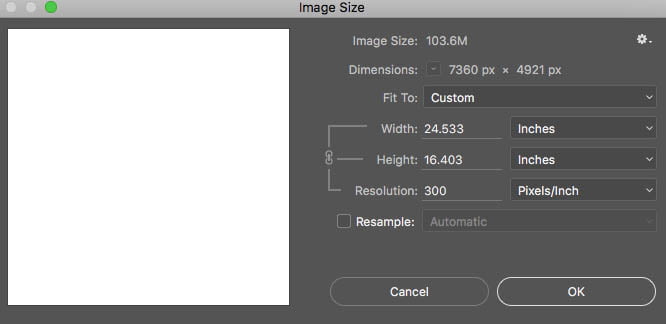
The image size window has done all the math for you.
You see, the Image Size Window really acts as an invaluable calculator. It has first converted pixels into inches, and it has now shown you that your 7,360 x 4.921 pixel image at 72 PPI is equal to and capable of printing roughly a 24.5″ X 16.4″ photograph at 300 DPI. That’s a very nice size wall portrait!
Next, recheck the Resample box and make sure to keep your width and height in inches.
Now change your longest dimension to 6 inches. In this example our longest edge is the width, so this is a horizontal 4×6.
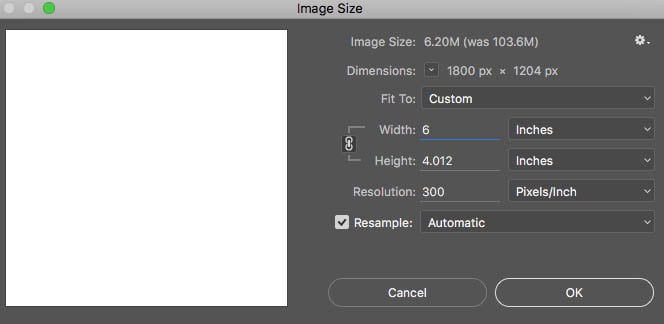
Notice now your Image Size went from 103.6 megs to only 6.2 megs.
And there’s something else. It turns out the digital file coming out of this particular camera is already proportional to a 4×6 photograph! Why do you suppose this is?
It’s because professional photo labs are in the business of selling paper. A 35mm negative (film) was exactly proportional to a 4×6 photograph, so labs sold 4×6 pieces of paper. And now, with the invention of the digital camera, the material used to capture the image inside most professional grade digital cameras is also exactly proportional to a 4×6 dimension, so labs can continue to sell you 4×6 pieces of paper.
At this point, go ahead and click OK and your image will be resampled, or “sized down”, to a 4×6 at 300 DPI.
The Second Image Sizing Method: Cropping
An additional way to create a specific image size at 300 DPI for printing is to use the cropping tool in your image editing software.
First make sure your image has enough pixels to print your desired image size, then simply select the cropping tool, enter in your desired width and height and set a resolution of 300 DPI.
Crop your image and the resulting file will be to your specifications.
IMPORTANT NOTE: It is possible to actually increase the size of an image with your cropping tool. For example if you crop a 4×6 300DPI image to an 8×12 300DPI image you will actually be creating new pixels, or sizing up your image and your resulting printed image quality will be rather poor.
IMPORTANT NOTE: Make sure to save your file as a new file so you do not overwrite the original larger file.
IMPORTANT NOTE: Your image is not yet ready to print.
At this point what you have actually done is told your computer to throw away information. You have actually removed pixels from your image resulting in the smaller desired image size. However this will also cause your image to appear a bit “fuzzy” or “soft”.

Sharpen Your Image Before Printing
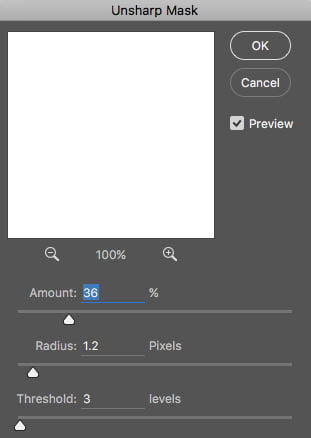
In Photoshop, go to Filter – Sharpen -Unsharp Mask.
There are many methods to sharpening an image, but Unsharp Mask is my personal go to method after sizing down an image.
Start with the settings I’ve set here.
As a general rule, the more you sized down an image, in our case a 24″ wide image to a 6″ wide image, the more sharpening your image will need.
Simply move the Amount slider to the right, and then click in the image are where the white box is to see a before and after of the effect.
To much sharpening and you will see a halo around objects in your image. Go ahead and slide the slider all the way over to see what I mean.
Once you have found your desired level of sharpness, click OK and you are ready to send your image to your printer.
Your own personal printer or desired photo lab will have an optimal resolution for print sizes. Online printing services like Mpix will warn you if the resolution is not high enough for the size of image you would like to print. Services and printers can differ slightly, so it’s best to check and make sure. Nobody wants to hang a pixelated image on their wall.
The Myth of printing 300 DPI Images
Also relevant to the resolution discussion: I often hear people say that you need a resolution of 300 (300 pixels/inch) to create photographic quality prints. This is not always the case. An image printed on your printer at a resolution of 200DPI may look just as good as an image printed at 300 DPI. Give it a try.
The primary benefit of printing files at a resolution of 200 is the ability to create larger prints.
We know our original example above using a camera which creates a file at 7360 X 4921 is capable of printing a 24×16 at 300 DPI. Print that same file at 200 DPI and you can now print an amazing 36 X 24!
Ultimately, Don’t Get Hung Up on DPI
Remember, DPI means “dots per inch,” and it’s used to describe the sharpness and detail of a printed image but it doesn’t mean anything in the digital file itself. DPI is not an indicator of a files screen resolution, but it does tie into print quality.
Additional Resources/Tools
Here are some more in-depth discussions of image resolution, if you’re still confused or would like to learn more on the topic:
http://www.howtogeek.com/107163/htg-explains-everything-you-know-about-resolution-is-probably-wrong/

Leave a Reply